
How to Switch to HDMI on Laptop (Explained!)
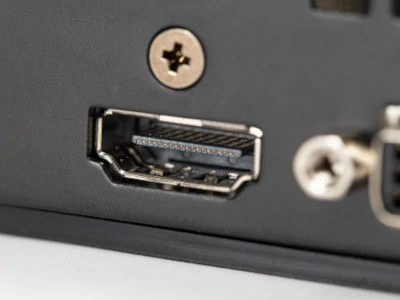
HDMI (High Definition Multimedia Interface) is an interface that enables the transfer of audio and video from one device to another without any loss in original quality.
In the modern era, most devices have HDMI input/port and compatibility with HDMI standards.
What Should I Do If My Device Doesn’t Have An HDMI Port?
Though quite rare these days except in older desktops/laptops that didn’t have HDMI ports, the simple solution is to use an HDMI adapter (i.e HDMI to VGA converter).
The second scenario would be if the HDMI port on your device isn’t working. The solution for this is to use another port, namely the DisplayPort (DP), mini DisplayPort (mDP), DVI or VGA.
Do You Need a Laptop with HDMI Input?
Yes because it is a modern standard, but (if you don’t have it and instead only) have a VGA output then you can always use a VGA adapter (VGA to HDMI converter) to make sure that your transmission is smooth, the only limitation you will face is that VGA only transmits video (not audio).
How Do I Switch HDMI On My Laptop?
The general process of setting up a HDMI device is quite simple, regardless of what laptop you are using. The process:
Step 1: First, insert an HDMI cable into the HDMI ports of your selected devices (laptop and output device).
Step 2: On the laptop’s display, select the correct HDMI input. Usually it’s done by pressing the AV button.
Step 3: You’re all set and your HDMI connection (and transmission) should be established after this but if it isn’t, you should follow the steps listed below.
Step 4: On the laptop’s display, go to control panel, select “Display” and click on “Adjust resolution”
Step 5: Select the right display from the “Display” drop-down menu.
Now this is a general process, whereas there are slight changes that we are going to look into when it comes to doing the same thing on different laptops.
Switch to HDMI on a Lenovo Laptop
Step 1: First, plug in one end of the HDMI cable into the HDMI output of your Lenovo laptop and the other end into the digital output device (HDMI input).
Step 2: You should automatically get connected but if it doesn’t then you have to search through the display options on your laptop and display the device manually.
Switch to HDMI on a Dell Laptop
Step 1: Insert HDMI cable into laptop and output device.
Step 2: Press ‘Fn ’ + ‘F1’ keys, this will activate the video output and you should have your screen displayed.
Switch to HDMI on a HP Laptop
Step 1: Insert HDMI cable into laptop and output device.
Step 2: On your laptop screen, right-click on the ‘Volume’ icon on the Windows taskbar, then select ‘Sounds’ and click on ‘Playback’ option.
Step 3: Select the HDMI tab and click ‘Apply’ to switch both the audio and video content.
Switch to HDMI on MacBook
Step 1: Insert HDMI cable into your MacBook and one end in the output device.
Step 2: Go to ‘Apple Menu’ and open ‘System Preferences’ then press ‘Displays’ and then ‘Arrangement’.
Step 3: Activate ‘Mirror Displays’ to cast the content on your screen to the displaying device.
Read More: How to Rent-to-Own a Macbook (NO Credit Check!). Learn everything you need to know about renting to own electronics.
How To Enable And Use HDMI Without Any Cables?
It is possible to use HDMI without having an HDMI cable, by using a wireless approach.The wireless options are listed:
Mirecast: This technology enables HDMI streaming through WiFi. It has not only replaced the HDMI cable but also has better compatibility. The only condition to use this is that both devices must be connected to the same WiFi network and be in range (for Windows 8 and above).
Chromecast: With Chromecast you can wirelessly cast HDMI content from your Android and iOS devices. To cast from a PC/laptop, you will need to have the Chrome browser installed.
Space Desk: Download appropriate drivers for your version of Windows (for Space Desk use) and make sure the input and output devices are connected to the same WiFi.
How do I Change My All-in-One Computer to HDMI?
If you want to change it all you have to do is simply change your HDMI output device and switch your laptop from PC to HDMI mode with the ‘HDMI IN’ button located on the bottom left side of the display.
How to Turn Laptop HDMI Output to Input?
To change HDMI output to input, you’ll need a capture card (i.e you can’t do it directly). It also requires a USB 3.0 (or above) port to work.
How Can I Enable The HDMI Port on My Computer?
Below are the following steps that guide you on how to enable the HDMI port on your computer.
Step 1: Get an HDMI cable and place your laptop near the device you physically want to connect to. Plug the HDMI cable on both the devices respectively.
Step 2: Turn on the device and your laptop screen should flicker and the HDMI output should turn on to display the screen.
How do I Enable HDMI on Windows 10?
If you want to enable HDMI on Windows 10 then proceed as follows:
Step 1: Right-click on the ‘Volume’ icon on the Windows taskbar, Choose ‘Playback devices’ and select ‘Digital Output Device’ or ‘HDMI.’
Step 2: To make this option default, click on the ‘Set Default’ option and press ‘OK’. This will set the HDMI output as the default.
Can You Use a Laptop as an External Screen?
On the laptop that you’d like to turn into your second monitor, head to Settings > System > Projecting to this PC. Your PC will scan for available displays, and you will then have the ability to extend or duplicate once your PC has found the second monitor.
How Do I Change My Monitor From DVI to HDMI?
The solution to your problem would be to purchase an HDMI Switcher. You could then connect a single display (your monitor) and each of your inputs (PC and Digibox) and have the ability to switch between them with the push of a button, or with a remote – depending on the switcher you purchased.
How Do I Set HDMI As The Default Output?
Right-click on the volume icon on the taskbar. Select Playback devices and in the newly open Playback tab, simply select Digital Output Device or HDMI. Select ‘Set Default’, click OK. Now, the HDMI sound output is set as default.